Wednesday, 27 March 2013

Nails Inc Bloomsbury Way and Grosvenor Gardens

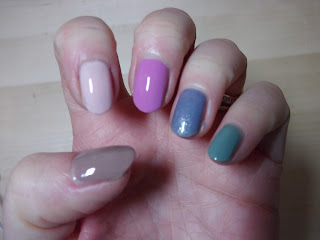
Well, yesterday I swatched the whole Nails Inc Garden Party Collection, and now I am wearing Bloomsbury Way with Grosvenor Gardens. The pink is probably my least favourite of the set, the other two I instantly loved but pale pink is a bit of a change for me.
However it painted on well and coverage was pretty good in two coats. I would probably have been tempted to do a 3rd coat if I was wearing this alone as you can see a visible nail line and this bothers me, particularly as my nail lengths are quite variable. It was very cold yesterday when I painted these so I don't think I got the very best finish, and I can see ridges in my nails that most shades disguise.
It is a very pretty soft pink and in warmer weather I think I would wear it again, although its likely to be used as base for a glitter, graffiti or some other special effect.
Nails Inc Bloomsbury Way
 Now for the fun bit. I decided to try a gradient : I do actually prefer a gradient from the bottom of the nail but since there was a VNL to be disguised I did a tip gradient instead. This is a densely packed glitter, a mix of pink, purple and silver large hexes, smaller pink and purple hexes, then smaller green & silver ones and and fine glitter and you get a lot of glitter on the brush, so I found this a bit tricky, but this is the end result.
Nails Inc Grosvenor Gardens
I'm afraid the ridges still bothered me, so in the end I went for a full nail of glitter and now I have super sparkly nails and the pink is a very pretty backdrop to this gorgeous glitter. I took quite a few shots to try and capture it - I hope you can begin to see how pretty it is
Nails Inc Grosvenor Gardens
 Nails Inc Grosvenor Gardens
 Nails Inc Grosvenor Gardens
 Nails Inc Grosvenor Gardens
 Nails Inc Grosvenor Gardens
 Nails Inc Grosvenor Gardens
 Nails Inc Grosvenor Gardens


Tuesday, 26 March 2013

Nails Inc Garden Party Collection

Almost an impulse buy for me last week, I had seen a couple of preview pics and decided if the show looked good I would go for this.
This is a stunning summer collection, made up of 3 pale, pastel and quite neutral shades and  a stunning chunky glitter.
Pembridge Crescent is a pale, grey lilac cream, Holland Park Gardens a pale sage and Bloomsbury Way a pretty pale pink, pink but not too sugary pink.
I don't own many pinks so no comparisons there but I have swatched the 3 creams with 2 other colours that came to mind as I was looking at this collection, Leighton Denny Leading Lilac and OPI Thanks a Windmillion. These are two of my favourite colours for those odd occasions when I do move away from darks and nudes, but when I get new colours I like to know where they fit in with existing varnishes.
As you can see, Pembridge Crescent is a little paler and much greyer than Leading Lilac, Holland Park Gardens is in my opinion a very silimar shade to Thanks a Windmillion but much paler.
 
The 3 cream shades are beautiful. They all applied well in two coats, with good coverage.
And now for the stunning glitter Grosvenor Gardens, a mix of pink, purple and silver large hexes, smaller pink and purple hexes, then smaller green & silver ones and and fine glitter. I blew my pic up really big to try and identify the colours and sizes and have probably missed some.
Pretty stunning eh!! Here are some more shots, I did a bit of a gradient first and then went for a full coat. Well, these are on wait-list at QVC at the moment, and I can say for certain, they won't be getting mine back! All we need now is the summer!!


Ciate Vintage

This is a beautiful grey green, a lovely neutral shade that I found very easy to wear.
I have to confess I fell in love with it when a fellow facebook nail fan posted pics up just before Christmas as this was one of Ciate's Advent Calendar minis. I saw it, thought it was absolutely me, but had no intention of buying the calendar so thought no more about it, until I saw it for sale on another page. I swooped on this one and 4 others, that I had also seen pics of pre Christmas.
They are such sweet little bottles and I was a bit concerned I'd find them too fiddly but I had no problems. The first coat was a bit streaky but by the second coat coverage was perfect. Wear was good too, although I topped this with Nails Inc Great Portland Street feathers, there was no tip wear over 4 or 5 days.

Saturday, 23 March 2013

Nails Inc Great Portland Street feathers

I can't find any swatches online on this one, so maybe I'll be the first!!
Great Portland Street feathers is part of the latest auto delivery from the last Nails Inc TSV. It is a stunning mix of silver, red and purple bar glitter. It is super sparkly and I am so glad I got my hands on it.
I have actually seen a couple of swatches within facebook, fell in love with it instantly and had to have it. It arrived today so here it is.
I have painted it over Ciate Vintage, as I wanted a contrast with the red and the purple. I have just done the one coat, and then a coat of topcoat. It feels quite smooth so but I might add a 2nd coat of topcoat for a really smooth finish.
Nails Inc Great Portland Street

  Nails Inc Great Portland Street
Nails Inc Great Portland Street
   Nails Inc Great Portland Street
 and some daylight shots.. Indoors and out in the snow !!!
Nails Inc Great Portland Street
 Nails Inc Great Portland Street

Nails Inc Great Portland Street
 Nails Inc Great Portland Street
 Nails Inc Great Portland Street


Thursday, 21 March 2013

Nails Inc Belgravia Gardens and China Glaze Make a Spectacle

I have a beautiful nude for you today. I love nudes, and probably have slightly more than I need, but I love their subtle differences. Nails Inc Belgravia Gardens was either in a TSV or an auto delivery after a TSV, not sure as I got mine in a swap and when I first received it I thought it was the same as Basil Street. In the bottle they look very similar but on the nail Belgravia is darker and cooler, although still quite a warm nude.
It went on well, giving excellent coverage in two coats and I loved it the instant I put it on.
Shown here without a top coat.
I decided to add some subtle sparkle, so I chose another untried, China Glaze Make a Spectacle, which is a  pretty mix of shimmery hexes and fine glitter. I can see golds and greens in it on my nail, but can also see blue, pink and purple in the bottle and have seen those colours on other swatches, so I will be testing this one again on a less neutral base to pick those other colours up.

It's so pretty I took lots of pics over a couple of days to try and capture as much loveliness as I could!
This first pic does capture a lot of the colours, I can certainly see blue. pink and purple here, as well as the green & gold.


And finally some of shots with a matte top coat, added after a couple of days. No pink or blue in this shot but you can really see the other colours and I’m really rather pleased with this.


OPI Lights of Emerald City - swatches

I've sat on this blog for a few  days trying to decide how to phrase my opinions fairly, and after all they are just my opinions.
I thought this looked lovely when I first saw swatches of it, so I was really excited to try it.
I spent a long time deciding what to try underneath it and decided to try a range of pretty pastel shades that I thought would tone nicely with the pretty squares of glitter in this polish. There seem to be all sorts of pretty colours in this jelly base- blue, pink, green, gold as well as the matte white squares.
I chose Nails Inc Belgravia Gardens, Instyle Peach Sorbet and Instyle Power Pink, and OPI I Don't Give a Rotterdam and Thanks a Windmillion.
So here is the bottle - looking very pretty..
And the nails, all nicely prepared
I really struggled to get the white squares out, when I removed the brush from the bottle I either had too few or too many and by the time I had wiped the brush on one side they were all gone. Then in trying to build them up on the nail I ended up with far too much varnish and messing around with positioning smudged the lower layer, particularly noticeable on the thumb and  index finger.
All the little squares of iridescent glitter are so pretty but I don't like the white squares, after spending so long fishing them out.
I am quite pleased with the choices I made for the base but the white is just not to my taste. Thus is the result.
I added a matte top coat to see if I liked it any better, the pictures look quite nice I think but again, its just not me. The matte effect worked well and I'm glad I've tried this but not sure I'll try again :(
As I said at the beginning, they are just my views, I still think this is a lovely polish but not for me.

Tuesday, 19 March 2013

OPI Can't Let Go - with top coats

Had a bit of fun playing around with top coats on this one, not sure it really added anything much but it's always worth a try.
I was a bit concerned that the Liquid Sands do start to lose their colour after a day or so, it didn't chip or get particularly noticeable tip wear but some of the glitter started to go silver, as it did with Stay The Night.
It is "Matte it up" week in the facebook group, so obviously I had to see what a matte top coat would do.
I had already posted a pic of the varnish there anyway since technically this is a matte polish (its not shiny).
The matte top coat really did soften the whole effect, the glitter lost its sparkle and the varnish took on a look more similar to the Nails Inc concrete finishes. There are some Liquid Sands that don't have glitter but I haven't seen them in the flesh yet so I can't compare. At some point I should try this again on fresh mani to see if it helps the glitter keep its colour, but once I had "matted" it, I added my normal top coat. It still looked bumpy, but felt much smoother, and I probably could have got a smoother look with a 2nd coat.
I think it looked best before I started messing around.
So here are the pics...with no top coat
With the matte top coat
With the normal glossy top coat